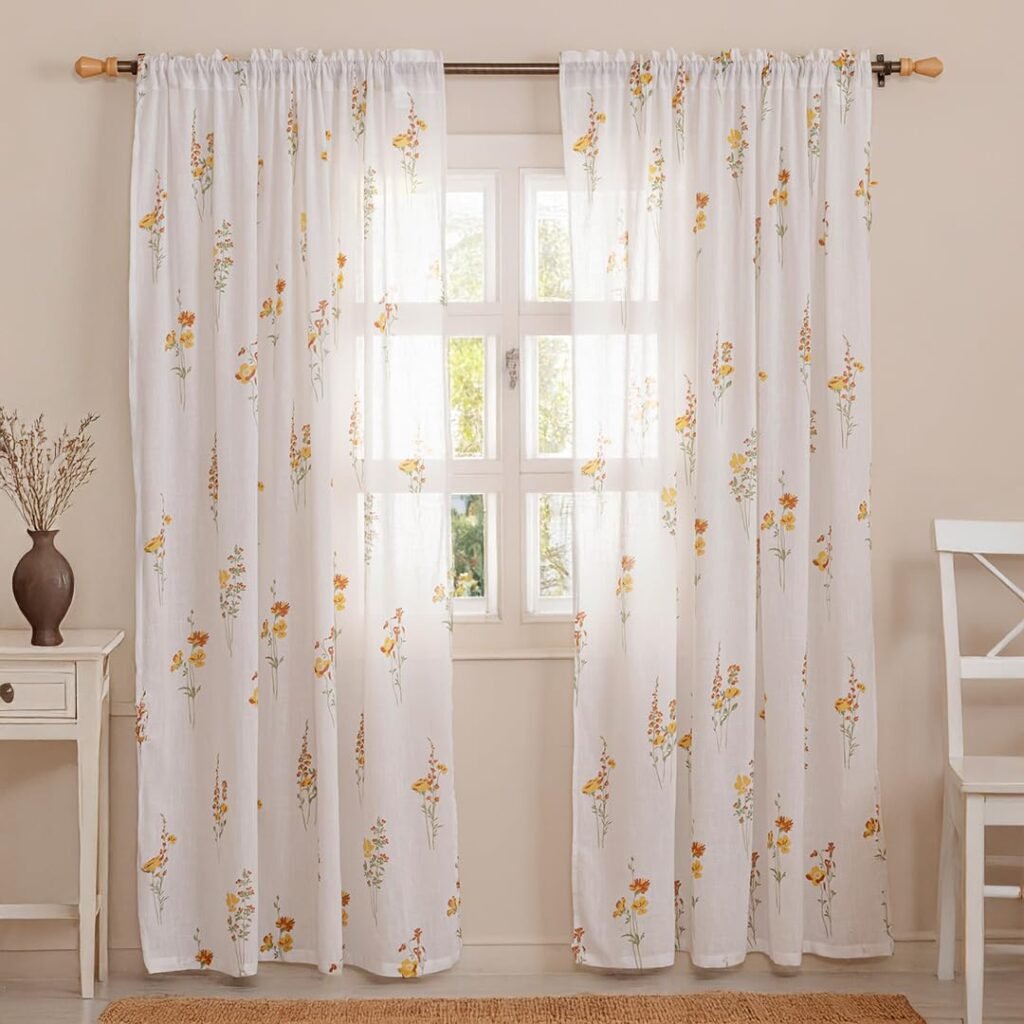
Buying curtains without a prior measurement is one of those things that works well in theory. But when the curtains actually arrive, you find out they are twelve centimetres too short, or so skinny that they don’t even touch in the middle when pulled together, or so large that they gather in an unsightly way on both sides of a small window.
Returns are a hassle. Buying replacement curtains is an expense. And in the meantime, you are living with windows that look wrong every single day.
Measuring windows for curtains is genuinely simple — but it requires the right approach, the right tools, and knowing a few things that curtain manufacturers usually do not tell you upfront. This guide covers everything: width, drop, rod placement, different window types, and common mistakes that even experienced decorators make.
What You Need Before You Start
Before measuring a single thing, gather these:
- A metal tape measure — not a fabric one. Fabric measuring tapes lose their tension over time and give less accurate measurements. A rigid metal tape is necessary to obtain precise curtain measurements. A mistake in the measurement of a few millimeters, should it be scaled up over the entire curtain width, can lead to curtains that won’t hang properly.
- A pencil or chalk marker — for marking the wall where you plan to position the rod brackets
- A spirit level — for making sure the rod will hang straight. A rod that is even slightly off-level means curtains that are visibly uneven at the floor
- A notepad or your phone — for recording measurements as you go. Do not rely on memory between windows.
- A step ladder if your ceilings are high — measuring from a 9 or 10-foot ceiling while stretching on tiptoe gives inaccurate results and is also dangerous
✦ PRO TIP: Always measure each window individually, even if they look identical. Windows in the same room are frequently not the same size — particularly in older homes where walls may have settled slightly over time. If you only take a measurement one time and assume the other lengths are the same, this is the way you will end up with two pairs of perfectly fitting curtains and the third pair being not quite right.
The Two Measurements That Matter Most
Curtain measurements revolve around two numbers: width and drop. Everything else stems from these figures.
- Width: how wide the finished curtain needs to be to cover the window properly
- Drop: how long the curtain needs to be from the rod to the floor, sill, or wherever you want it to end
Both of these are affected by choices you make before measuring — primarily where you decide to mount the rod. So the first step is not to measure the window at all. It is to decide where the rod will go.
Step 1: Decide Where the Rod Will Be Mounted
Many curtain guides almost entirely skip this decision, thinking it does not impact the last result much while in fact it surpasses any measurement taken for the final outcome. Placing the rod is not only a matter of how tall the curtains will look. It changes the perception of the window size, and the mood of the room – airy or enclosed.
Option A: Mounting the rod at window frame level
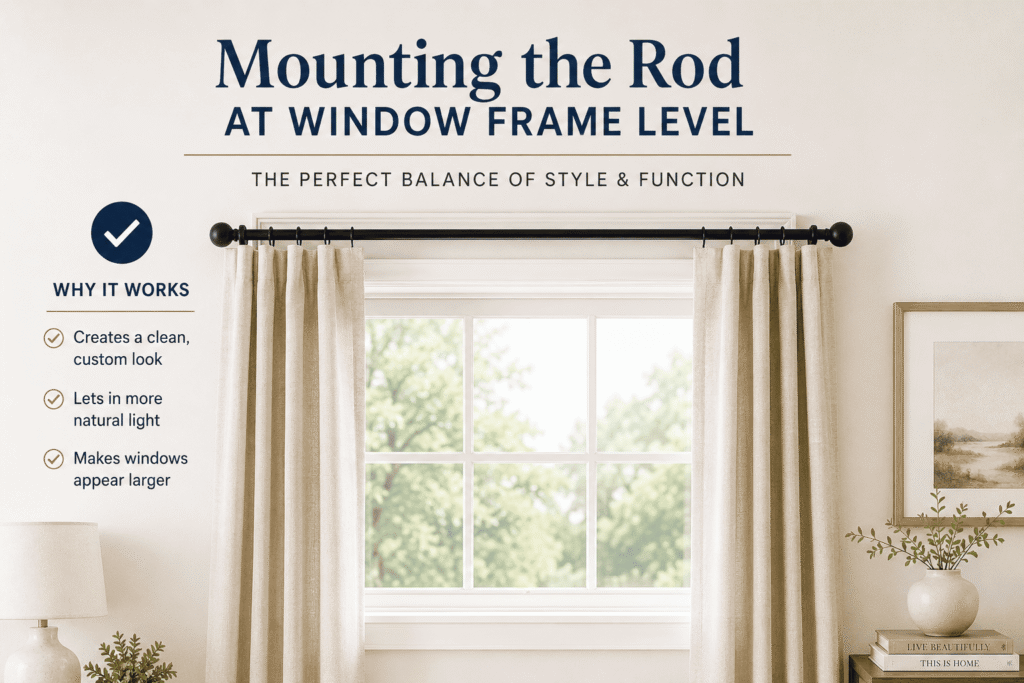
Rendering the rod just a few centimetres over the window frame top is probably the most conservative solution. It is the most common way, and the easiest to measure for, but also the one that visually reduces the room size the most. The window is simply a window. The area of the ceiling above the frame remains unused.
Choose this option solely if for structural reasons you cannot go higher — a floor joist just above the window, an architrave detail that does not allow the rod to be placed above it, or a very low-hanging ceiling that would make a higher installation look odd.
Option B: Mounting the rod 10 to 15 cm above the frame
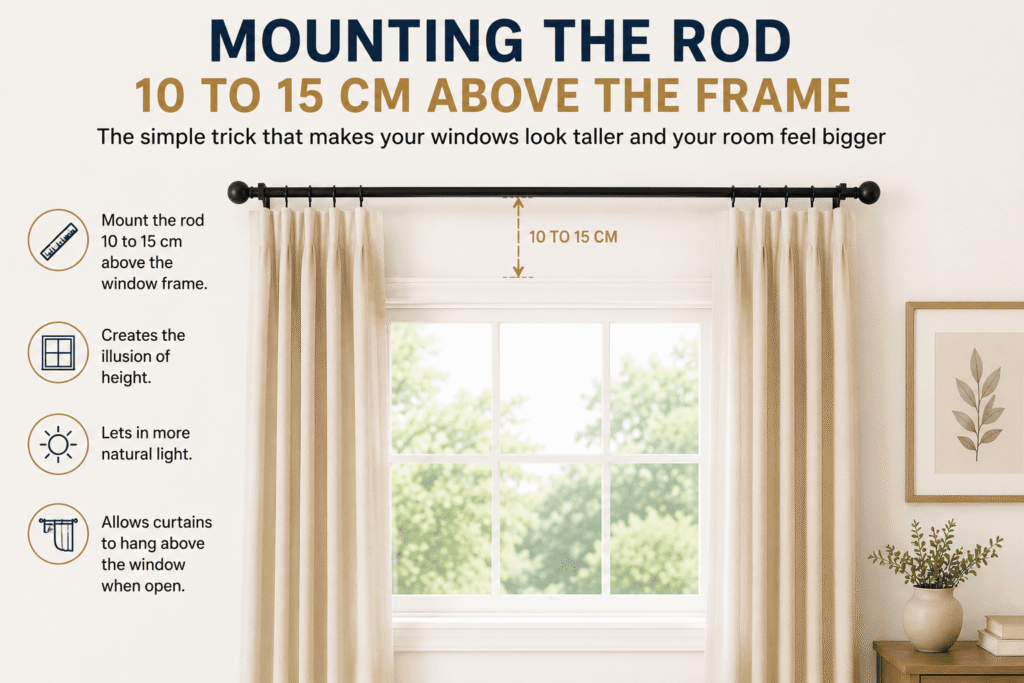
This is the typical advice of most designers for the majority of the houses. Mounting the curtain rail 10 to 15 centimetres (4 to 6 inches) higher than the upper edge of the window frame gives an illusion that the window is taller than in actual fact. The curtain merely hides the extra wall area above the frame, and at one time it was thought of as the curtain’s continuation rather than a space. This simple trick makes both your window and the room appear much larger right away.
Option C: Mounting the rod at or near the ceiling
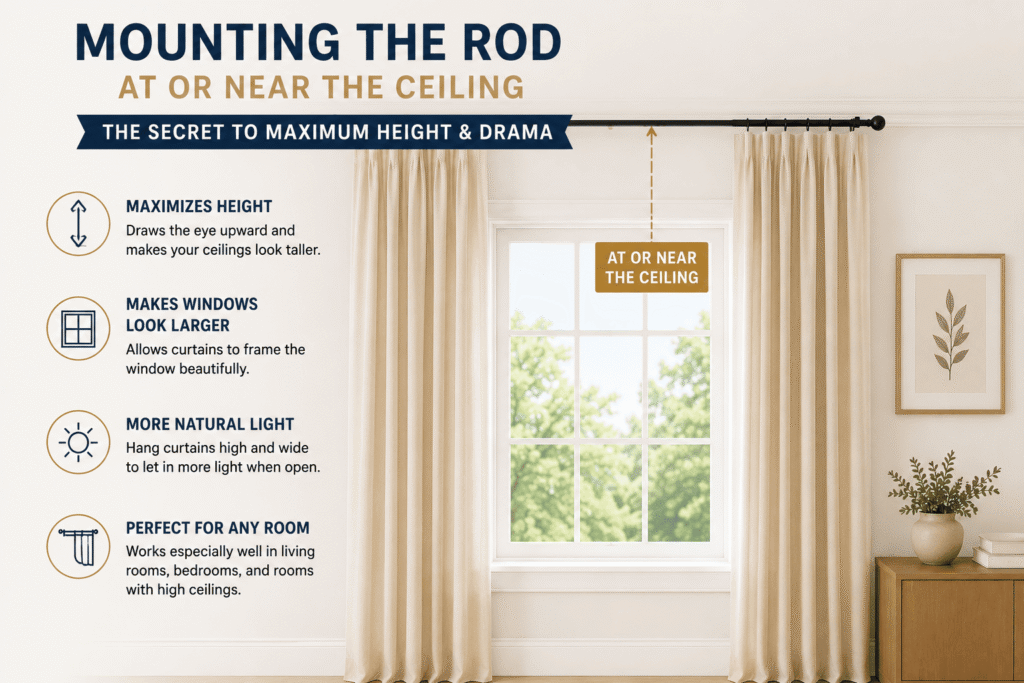
If you want to create rooms with the highest possible height and a dramatic effect – or if the ceiling is lower than you would like – then raising the curtain rod as close to the ceiling as possible will create a ceiling to floor curtain run that is so elegant it will transform the space. Curtain rods may be concealed within the curtain heading in this arrangement to create the impression that they start at the ceiling, adding depth and creating the sensation of height in rooms with 8-foot (240 cm) ceilings.
This method works particularly effectively when trying to create this sense of height in these settings. Besides, this is the technique applied in the majority of luxury hotel rooms and upscale residential properties.
✦ PRO TIP: Before fixing a rod position, do a soft wall marking with a pencil where you plan the rod to be. Then putting a curtain panel on that mark, step back and see your window from other side of the room. This basic check done in a minute will show you the right height or you’ll find out that you desire an even taller one.
Step 2: Measure the Drop (Curtain Length)
Once you have decided where the rod will be, measuring the drop is straightforward. Here is the method:
- Hold one end of the tape measure at the point where the curtain ring or hook will hang on the rod — not the rod itself. The ring or hook adds height, and measuring from the rod rather than the ring is one of the most common causes of curtains that are slightly too short.
- Extend the tape straight down to your intended end point and note the measurement.
- Decide what your end point is: the floor (for floor-length curtains), the sill (for sill-length), or somewhere between (for apron-length).
- Add a safety margin If you’re going for floor curtain length, take 1cm off the floor measurement to allow a small clearance which will look very deliberate. Add 3 or 5 cm, little puddle. Never rely on the floor as the exact measuring point and order that length — even a slightly uneven floor will mean exact-length curtains will be touching the floor at one spot and floating above it in
Drop measurements for different curtain endings
- Sill length: measure from ring to bottom of window sill. Take away 1 cm if you want the curtain to finish just above the sill instead of touching
- Apron length: measure from ring to 10-15 cm below the window sill
- Floor length: measure from ring to floor and subtract 1 cm for clearance
- Puddle length: measure from ring to floor and add 3 cm (small break) to 15 cm (full dramatic puddle)
📌 NOTE: if the floor in your home is uneven – which often happens with older properties – take measurements at three points along each window at least to get drop measurements for left edge, middle, and right edges of each window to decide the length of curtain fabric needed. When setting curtain measurements to cover every part of your floor surface equally.
Step 3: Measure the Width
Width measurement is where more mistakes happen than almost anywhere else, because many people assume the curtain width should simply match the window width. It should not — and this is one of those pieces of curtain knowledge that is not obvious until someone explains it.
Why curtains need to be wider than the window
Curtain panels that perfectly cover their window in width will hang tightly with no gather or fullness when drawn closed, creating an appearance of stretched fabric pinned against a surface rather than curtains hung at windows. Curtains require fullness when drawn closed – creating folds of fabric when you draw back close, creating depth and movement to complete their aesthetic effect.
The minimum fullness ratio for curtains is 1.5 times the window width. The ideal fullness for most curtain styles is 2 times the window width. For very luxurious, full gathering — the kind you see in hotel lobbies and designer show homes — 2.5 to 3 times the width is used.
How to calculate the width you need
Follow these steps:
- Measuring from left edge to right edge and taking note as your base window width.
- Add the return: this distance runs between each end of your rod and the wall – typically 5 to 10 cm per end in standard rod with brackets setups – and gives an estimate for how much span needs to be covered by curtains.
- Add stack-back allowance: When curtains are fully open, each panel needs somewhere to go when opening them completely; typically this entails 15 to 30 cm stacked against the wall beside your window when fully opened. To ensure full glass clearance when fully opening them up, add this allowance when creating your total span length.
- Multiply this number by your desired fullness ratio (1 minimum, 2 standard fullness). This gives the total finished curtain width required.
- Divide by the total number of panels (usually two). This reveals how wide each individual panel should be.
A worked example
Window frame width: 120 cm. A rod extends 10 cm past each side of the frame for total span of 140 cm; 20 cm allowance on either side is allowed as stack-back for total span with stackback of 180 cm; this means multiply by fullness ratio 2 for 360 cm total curtain width which needs to be divided among 2 panels, each needing to be 180 cm wide.
Most standard ready-made curtain panels are 137 cm (54 inches) or 168 cm (66 inches) wide. If your 120 cm window requires 180 cm wide panels, you will either have to go for the next readily available size or have them made to your specifications.
✦ PRO TIP: If you are unsure about the width, always choose the wider one. The additional fabric can be hidden when curtains are drawn to the sides and there will be no noticeable bulk when they are shut; on the other hand, the curtains that are too narrow are instantly noticeable and cannot be fixed unless new ones are bought.
Step 4: Account for the Curtain Heading
A curtain’s heading is the section at its upper edge that attaches to its rod or track and influences how its measurements function as well as how its overall hang and style may appear. There are various heading styles available which impact its hanging and measurement performance.
Eyelet or grommet heading
Eyelet or grommet heading tape for curtains
The metal rings (eyelets) sit directly on the rod. The top of the curtain is the highest point, and the eyelet itself sits at rod level. Measure your drop from the bottom of the rod (since the eyelet circles around it) to your end point. Eyelet curtains typically add 3 to 5 cm at the top that does not appear as visible curtain length.
Rod pocket heading
The fabric forms a pocket through which the rod slides. The top of the rod pocket sits above the rod itself, and the curtain below hangs from it. Measure from the top of where the rod pocket will sit to your end point. Rod pocket curtains effectively start slightly above the rod.
Pencil pleat heading
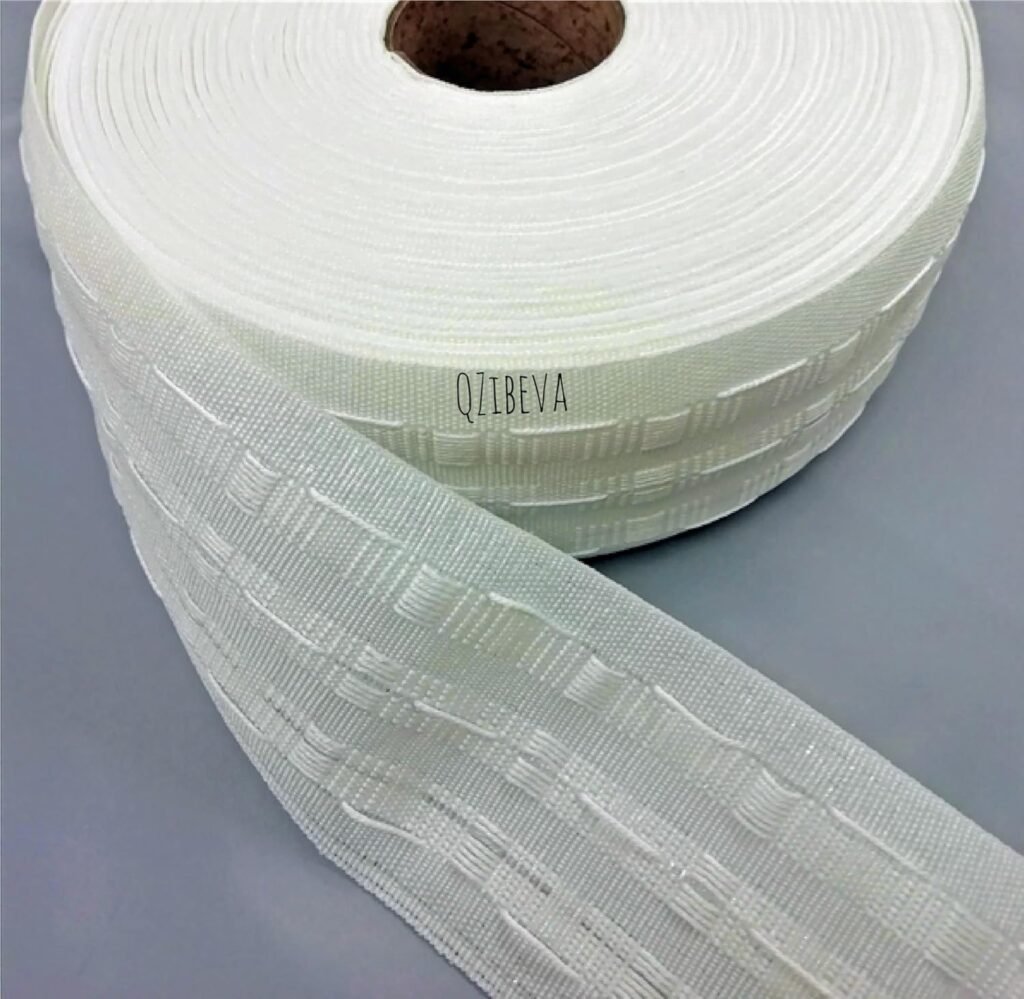
The most traditional heading type, where header tape creates a gathered, pleated top. The curtain hooks attach to rings or a track. Measure from where the hook sits in the track or on the ring, down to your end point. Pencil pleat headings typically reduce the finished width of a curtain by about a third when gathered, so buy wider to account for this.
Tab top heading
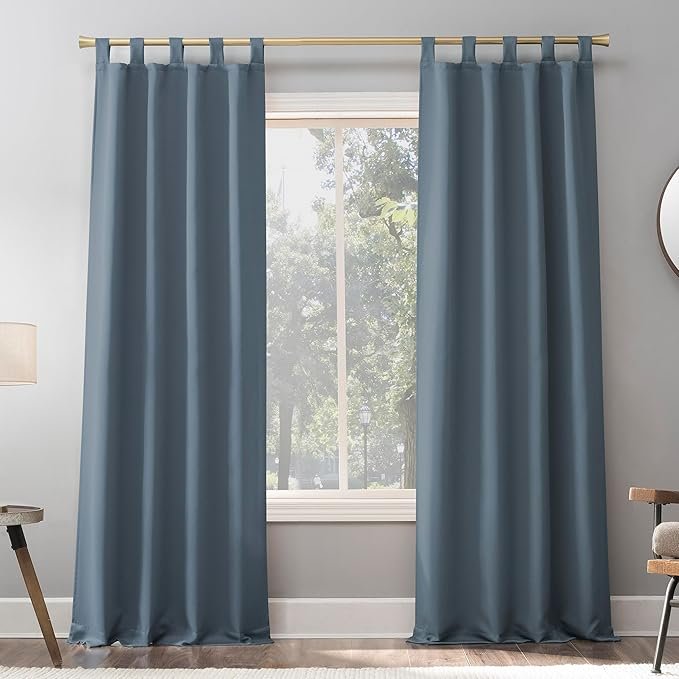
Fabric loops hang over the rod. The tab itself takes up height, so the curtain body begins below the rod level. The longer the tab, the more gap between the rod and the top of the main curtain panel. Account for the tab length when measuring your overall drop.
Measuring Different Window Types
Standard flat windows
The simplest case — follow the steps above. Measure width, decide drop, mark rod position, and order accordingly.
Bay windows
Bay windows require treating each section of the bay separately. Measure each angled or straight panel of the bay individually for both width and drop — they are frequently not identical even when they look it. Use a specialist bay window curtain track or rod that follows the angle of the bay, and order curtains for each section.
The alternative is to treat the entire bay as a single large window with one straight rod mounted across the front of the bay opening. This is simpler but means the curtains do not follow the shape of the bay when closed.
Floor-to-ceiling windows and glass walls
For very large windows, the width calculation matters enormously. Stack-back becomes a major consideration — wide panels of heavy curtain fabric take up significant wall space when open. Plan the stack-back carefully so the curtains clear the glass fully when open without covering too much wall.
Ceiling-mounted tracks are typically the ideal hardware solution when dealing with floor-to-ceiling glass walls. Measure from the ceiling track to the floor to get your drop, and arrange for panels that have a total curtain width of at least double the total glass width.
Skylight and roof windows
Skylights need specialist blinds rather than conventional curtains — no standard curtain rod or track can be fitted to a skylight. Measure the glass area only and look for dedicated skylight blind systems that fit into the window frame channel.
Arched windows
Arched windows are one of the most stunning architectural features in any home — yet can also present one of the greatest challenges when it comes to curtains. Most homeowners tend to hang curtains from only where the arch begins (at its shoulder), treating it like an ornament and hanging straight curtains from there down towards the floor for drop and from wall-to-wall at curtain hanging level for width.
Standard Curtain Sizes — Understanding What You Will Find in Shops
Ready-made curtains come in standard sizes that you should understand to determine when a standard size will do and when custom orders may be necessary.
Standard drops in the UK: 54 inches (137 cm), 72 inches (183 cm) and 90 inches (229 cm), while in the US they would typically measure: 63 inches, 84 inches, 96 inches 108 inches 120 inches with standard widths per panel of 46 inches, 54 inches, 72 inches (183 cms and 90 inches (229 cms).
India often sells curtains by the running meter of fabric rather than prefabricated panels in fixed sizes, providing greater customization of length and width options as well as fullness ratio control. Fabric sales by running metre is therefore often preferred over readymade panels in predetermined sizes for custom length and width requirements.
📌 NOTE: In the UK, curtain widths are listed per pair — so a ’66×90′ curtain is 66 inches wide (per pair) and 90 inches long. In the US, widths are often listed per panel. Always check before buying whether the quoted width is per panel or per pair.
When to Order Custom-Sized Curtains
Standard sizes work well for most modern homes with regular window proportions. Order custom-made curtains when:
- Your ceiling height does not correspond to any standard drop — common in period properties, loft conversions, and homes with unusually high or low ceilings
- Your windows are unusually wide and even the widest standard panels will not achieve the right fullness ratio
- You want a very specific fabric that is only available by the metre, not in ready-made form
- You want a puddle length longer than any standard offers
- Bay window sections are unusual sizes that do not correspond to standard panel widths
Choose your fabric for custom curtains – be they velvet, cotton, linen or sheer — give greater control over both their dimensions and aesthetic. Although more costly than ready-made alternatives, custom curtains fit seamlessly and look far superior than any approximate standard size approximations.
Recording and Using Your Measurements
Once you have your measurements, keep them organised so you can refer back to them easily:
- Note measurements in a single consistent unit — either centimetres or inches throughout, not a mixture
- Record the rod position height, the window frame width, the total span including rod extensions, the required drop, and your fullness calculation for each window separately
- Take a photograph of each window from directly in front — this gives you a visual reference alongside the numbers and is helpful when ordering online or speaking to a curtain supplier
- If ordering custom, note the heading type you want — eyelet, rod pocket, pencil pleat, or tab top — as this affects how the supplier calculates the finished measurements
Measurement Mistakes That Cost Money
These are the most common and most expensive curtain measuring mistakes — all avoidable:
- Measuring from the rod instead of the ring — curtain rings and hooks add height. Always measure from the lowest point of the ring or hook, not from the rod itself.
- Forgetting to account for fullness — buying panels as wide as the window. The curtains will look flat and stretched. Always multiply by at least 1.5.
- Measuring window glass rather than frame — since frames tend to be larger, your curtain needs to cover both frames as well as glass for effective light blocking from all directions.
- Using only one measurement point for drop measurements – especially in older homes where floors may not be completely level – could yield misleading results. Instead, consider measuring at several locations simultaneously to accurately gauge any drop.
- Not accounting for header height in eyelet curtains — the eyelet itself takes up height and means the curtain starts lower than the top of the fabric. Factor this into your drop calculation.
- Buying curtains before deciding on rod position — the rod position determines both the drop and how the finished result looks. Decide rod position first, measure second, buy third.
⚠ WATCH OUT: Never order curtains online using an estimate or measurements taken with fabric tapes and smartphone measuring apps as these will lead to curtains which don’t fit as expected. Instead, invest in an accurate metal tape measure, measure twice before ordering once.
Final Thoughts
Measuring for curtains takes approximately fifteen minutes per room when done accurately and can help avoid the frustration associated with ordering and receiving curtains that arrive only to later wish they were longer or realize the two panels do not quite align in the middle.
Time invested in getting measurements just right — rod position decided first, width calculated with appropriate fullness ratio calculations and drop measured from the ring rather than rod, floor level checked multiple times — is one of those decorating tasks where return on investment directly matches care put forth.
Once you know exactly what measurements and materials to select for a project, the next step should be selecting fabric and colours to maximize those dimensions. No matter whether replacing single windows or refitting an entire room – getting both measurements and materials right will result in results that feel truly pleasing rather than simply satisfactory.
Frequently Asked Questions
Q: How do I measure curtains for a window with a radiator below?
A: If a radiator resides beneath a window, floor-length curtains could rest upon or be forced away by its heat — both options being both unsightly and potentially harmful to them. Instead, sill- or apron-length curtains that end above it or side hanging arrangements whereby each side hanger extends far past each side window can help ensure curtains hang entirely to either side of radiator when closed; or an overhead track that pulls curtains away from wall rather than against them are better alternatives to achieve optimal results.
Q: How wide should curtain panels be?
A: Each curtain panel should measure at least 1.5 times the width of half your window – for a 120 cm window this would mean at least 90 cm wide before gathering. To achieve fullness on either end, aim for panels twice that half-window width (120 cm per panel in this example); 2.5 times (150 cm per panel). Most people underestimate just how wide curtain panels need to be!
Q: What if the standard curtain sizes do not match my measurements?
A: Always go with the larger standard size if your measurement falls between two options — for both width and drop. A curtain that is slightly too long can be hemmed easily. A curtain that is slightly too wide can be kept full and gathered more heavily. Curtains that are too short or too narrow cannot be fixed without buying new ones.
Q: Should I measure in inches or centimetres?
A: Use whichever unit the retailer you are buying from uses — and convert everything to that unit before placing your order. In the UK, curtains are commonly sized in inches (for historical reasons) despite the metric system being standard. In India and Australia, centimetres are more common. If you measure in one unit and order in another, conversion errors are very easy to make.
Q: How do I measure a bay window for curtains?
A: Measure each section of a bay separately — every straight or angled panel of glass has its own width and drop; treat them all as individual windows. When measuring bay window curtain tracks that follow an angled bay’s angle of baying, take measurements along each curved track length rather than measuring along an immoveable straight horizontal line as these may differ significantly in length from that determined from straight horizontal measurements.
Q: Do I measure for curtains before or after buying the rod?
A: Purchase your rod first before measuring. Rod diameter and type of rings/hooks used can affect drop measurement; various rod sizes/ring types add different amounts of height. Once in hand, take measurements accurately from where your ring lands to the floor to identify exactly which drop to order.

